
If you’re just starting to learn how to play the banjo, one of the first things you’ll need to master are basic banjo chords. Chords are a group of notes that are played together to create a harmony. In this article, we’ll go over some of the most common basic banjo chords and how to play them.
Check out this free Banjo Chord Chart
Play along with your favorite songs with our Free Banjo Tabs resource.
Learn Basic Banjo Chords
Before we begin, it’s important to know that the banjo is tuned differently than other stringed instruments, like the guitar. The most common tuning for the banjo is called “open G” tuning, which means the banjo is tuned to the notes G, D, G, B, and D, from the lowest to the highest string. Now that you know the tuning, let’s get started on the chords.
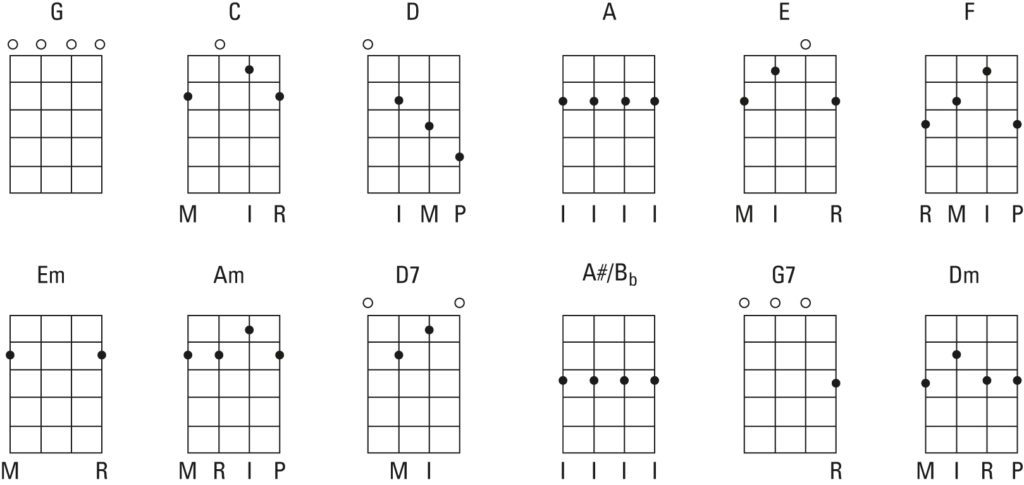
G Chord The G chord is one of the most commonly used chords in banjo playing. To play a G chord, place your index finger on the second fret of the fifth string, your middle finger on the third fret of the first string, and your ring finger on the third fret of the second string. Strum all five strings, and you should hear a bright, ringing sound.
C Chord The C chord is another frequently used chord in banjo playing. To play a C chord, place your index finger on the first fret of the second string, your middle finger on the second fret of the fourth string, and your ring finger on the third fret of the fifth string. Strum the top four strings, and you should hear a clear, mellow sound.
D Chord The D chord is a little more challenging to play than the G and C chords, but it’s still an essential part of any banjo player’s repertoire. To play a D chord, place your index finger on the second fret of the third string, your middle finger on the second fret of the first string, and your ring finger on the third fret of the second string. Strum all five strings, and you should hear a bright, full sound.
A Chord The A chord is another important chord for banjo players to learn. To play an A chord, place your index finger on the second fret of the third string, your middle finger on the second fret of the fourth string, and your ring finger on the second fret of the second string. Strum the top three strings, and you should hear a warm, mellow sound.
E Chord The E chord is a bit more challenging to play than the previous chords, but it’s worth learning as it’s used in many popular songs. To play an E chord, place your index finger on the first fret of the third string, your middle finger on the second fret of the fifth string, and your ring finger on the second fret of the fourth string. Strum all five strings, and you should hear a bright, ringing sound.
Now that you know some of the basic banjo chords, it’s important to practice them regularly to build muscle memory and develop your skills. You can also try transitioning between chords to practice your finger placement and timing. As you become more comfortable with these chords, you can start experimenting with different strumming patterns and techniques to create your own unique sound.
In conclusion, learning basic banjo chords is an essential part of becoming a skilled banjo player. The G, C, D, A, and E chords are some of the most commonly used chords in banjo playing and should be mastered early on. Remember to practice regularly and experiment with different techniques to develop your own unique style. With time and dedication, you’ll be playing like a pro in no time.
In this video from Mike Hedding, we learn your first basic banjo chords. Mike takes us through step by step, until you are playing with ease. Great for beginners.
Video Text:
0:00:05.2 –>
all right here out there banjo land Mike Hedding here got an absolute beginner lesson for you today we’re gonna just talk about the basic banjo chords so this is usually when I get a new in-person student and that has no experiences usually when I start them off with and we’re gonna keep our right hands our picking hand really simple on this lesson we’re basically just gonna focus on learning some of the basic Barre chords and some of the basic two finger chords absolutely kind of must know stuff too to advance on the banjos all right here it is all right let’s just start by talking about some of the basic banjo chords this is usually one of the first things I start when I have a new student especially if they’re starting from square one so we’re gonna start with the absolute basics in this lesson so in with a banjo we actually get one chord for free art if we just strum open that’s actually a G chord you may have heard that the banjo is tuned to open G so that’s kind of we get one
0:01:02.2 –>
free chord with the banjo where for example a guitar or a mandolin if you strum it open without putting your left hand down it’s not actually a chord it’s not tuned to a chord like a banjo is so we actually get one chord for free so if you just strum open you you know your first banjo chord G and what I recommend and even if you’re not starting using pics yet which I recommend but if you’re let’s say even if you’re just playing with your fingertips at this point try we’re gonna initially start by trying to get to use three fingers because we’re gonna play three-finger style banjo so what I recommend is playing on the top three string strings three two and one and see if you can just use each finger for one string so I’m gonna use my thumb on the third string my index on the second and my middle on the first and remember it doesn’t matter if you’re using picks right off the bat so just we’re just practicing getting our three fingers moving so let’s just do that a few times
0:02:08.4 –>
you [Music] just practice using those three fingers even if you go backwards [Music] we can alternate and some of these will be what’s called a role that we’ll use to play melodies in the future but like I said when you’re just starting you know even just coordinating your three fingers is challenging so don’t worry about if you’re doing a specific role pattern at this point that can come later just start by using three different fingers and I’m remember I’m using one finger for each string so that might take you awhile so so you know
0:03:00.4 –>
spend as much time as you need to on that so since we’re tuned to open I can also use a ball court to play other chords so I’m just gonna use my first finger and I’m gonna go up to the fifth fret so right up here to where you’re your fifth string peg is and I’m gonna put my finger on the top three strings those same strings we were just playing and I’m gonna try and do that same role [Music] one thing you may notice is normally my thumb’s kind of up here where you can see it when I do those Barre chords my thumb actually drops down and I pinch I pinch my thumb and index finger together the other thing I’m doing is I’m using the side of my finger not the top because if you’re using this flat part you’re kind of fighting against your knuckles because they naturally Bend the other way whereas if you use the side of your finger you’re not fighting against that knuckle so that’s really important so just take some time to figure out how to get that to sound good what I do is called the string test just play each
0:04:01.3 –>
one on its own and just adjust your hand accordingly remember the secret with the frets is to be close to the fret without being right on top of it if you’re you’re too on top of it sounds like that and if you’re too far away sounds like that so you want to be up close to the fret but not right on top of it and that’s just every banjo players a little different so just figure out you know how to get that to sound clean that’s a C that’s a really common one so you can do is practice going from open you know maybe do a couple of those patterns maybe do three okay then I’m gonna try to put my finger down do a pair of three then go back to open [Music] just trying to get your two hands to operate independently you need your right hand to be able to keep moving you
0:05:01.8 –>
know while you take your left hand off [Music] okay let’s take that cord and slide it up to the seventh fret that’s another very common one d we got G at the 5th fret of C at the seventh fret is d and actually wherever you move that index finger will be a chord so you can move that around wherever you want those will all be different chords but G C and D are very common chords you’ll use in the key of G so those would be the ones I would start with so let’s do that a few times remember don’t worry too much about what you’re doing with your right hand and this lesson we’re practicing our left hand so you know you’d if you’re just strumming with your right hand this is really a left hand exercise so back to D
0:06:02.1 –>
you can mix it open whatever order you want back to open so play those as many times as you need to mix them up in as many different orders as you can the more ways you mix them up the better you’ll kind of reinforce that you know it okay let’s look at one more down here that you’ll need a at the second fret if you do that Barre chord there’s another really common one hey we got C D G and I’m gonna go through these kind of quickly so feel free to pause the video and I’m certainly not expecting you to digest all this immediately so this might take a little time for be patient okay so now that we’ve got the basic Barre chord down let’s look at some some open to finger chords down here that that’s not just using one finger so let’s learn the C and the D so our C is
0:07:00.3 –>
if we put our first finger on the first fret of the second string we’re gonna use our third finger a ring finger up on the second fret of the first string so we’ve got let’s play those top three strings against we’ve got open first fret and 2nd fret and use your your first and third finger and I’ll show you why in a second so use your first and third finger I’m just going to do that same role never do the string test if you need to you have to figure out how to bend your hand so you can get all those notes to ring out now you practice taking your hand off [Music] maybe you’re trying to get you two hands to operate independently which is tough [Music] so Adi that I’ll use is if you take your C and move it to the middle strings so I
0:08:00.1 –>
moved both of them up this way and then I slide them up one fret so now I’m on to three and open on the top three strings that’s a really good deep [Music] and then to go to your seed go back down and then down let’s go to bulb in 2g and then let’s try and go that deep that’s a D another one that you might learn right off the bat is d7 and I like knowing both because d7 is really good for certain instances but it kind of has a bluesier flavor and if you’re playing a happy song in the key of D for example you won’t want to use that blue zt7 you’ll want to use your regular D but I’ll show you d7 2 because it’s another common one you’ll need to let’s go back to our C once we got 1st fret 2nd string
0:09:00.7 –>
third finger up on the 2nd fret of the first string that’s our C we take off our 3rd finger and put our 2nd finger on the 2nd fret of the 3rd string so now we’ve got 2 1 & open that’s d7 that’s a really good one to to figure out how you have to bend your hand go back to G go to see you d7 open member don’t worry about what you’re doing with your right hand right off the bat okay so let me show you a couple more real quick let’s go back to our C ones and that’s a two finger seat you can also do a three finger C is if you take your middle finger you put it down on the second fret of the fourth string so you’ve got to open one and two those are my frets that’s that’s the
0:10:01.5 –>
three finger seat you don’t have to do that one but it adds another flavor and if you end up playing the fourth string now you’ve got that string so that’s a three-finger see you can always do the two fingers see but that’s a good one to practice let me show you one more and I’ll show you why we wanted to learn the three fingers see that’s also why I wanted to do that second fret first string with my third finger because now I can do the full C words if you did this way you can really can’t do the full C it’s really tricky so do it this way let me show you one more if you take off your index finger now and leave your other two fingers down that’s an E minor so let’s play the top three strings again [Music] my first back to see take your first thing rockets so even with those four chords G C D and E minor you could probably play it close to
0:11:00.6 –>
10,000 songs there’s so many songs you could play with just those four chords so remember like I said work on mixing up in different orders that’s really gonna reinforce that you know it okay real quick let me show you a couple more chords and then we’ll call it a day so let’s go back to our three fingers see once if we take our index finger we move it up to the third string so now we’ve got one open – those are my top three strings that’s actually an E major the basically the only difference between a minor if you put your first finger now on the third string and with that one you want to be careful you don’t hit the fifth string because it won’t really sound that good so just leave off the fifth string with your strum there so that’s an E major and the reason the way I remember major versus minor as major as happy minor is spooky so very simplistic but it works at most people can tell a major chord versus a minor chord whew just remember happy first is spooky so major minor hey let’s go back
0:12:02.6 –>
to our C one more time more if you take our second finger and move it down to the third string so we’ve got two one and two those are my frets that’s an a minor that’s another really common one you’ll want to learn and lastly and I would wait until this one until your you’ve got all the other ones down but this isn’t ass this is another really common one so if we put our pinkie on the 3rd fret of the highest ring and you can take your third finger off that might release the pressure a little bit that’s an F chord [Music] you can go back to a minor see gee see so those are the basics let me show you one more lassie I’m very quick this one you probably won’t use too often but it’s a good two finger cord to learn if you take your first finger and put it up on the first fret of the first string
0:13:00. –>
take my second finger and put it on the second fret of the third string so I’ve got to open and one it sounds a little weird when you just do it on its own but that’s a b7 so you might use that one if you’re playing like a b7 back to e you know if you’re doing like a basic blues progression or something like that so you probably won’t use that one too often but occasionally you will run into it it’s basically like the d7 except you move your first finger to the first string so practice all those chords and remember don’t worry about in this lesson what you’re doing with your right hand whether you’re strumming practicing a new role focus on one hand at a time so if I’m learning some new chords with my left hand I’m gonna keep my right hand really simple and vice versa if I’m working on some new right hand patterns I’m gonna keep my left hand really simple alright hopefully that helps you out alright good luck